Galactic FBUnicorn Guide

Overview

A brilliant arduino-compatible way to tell people off

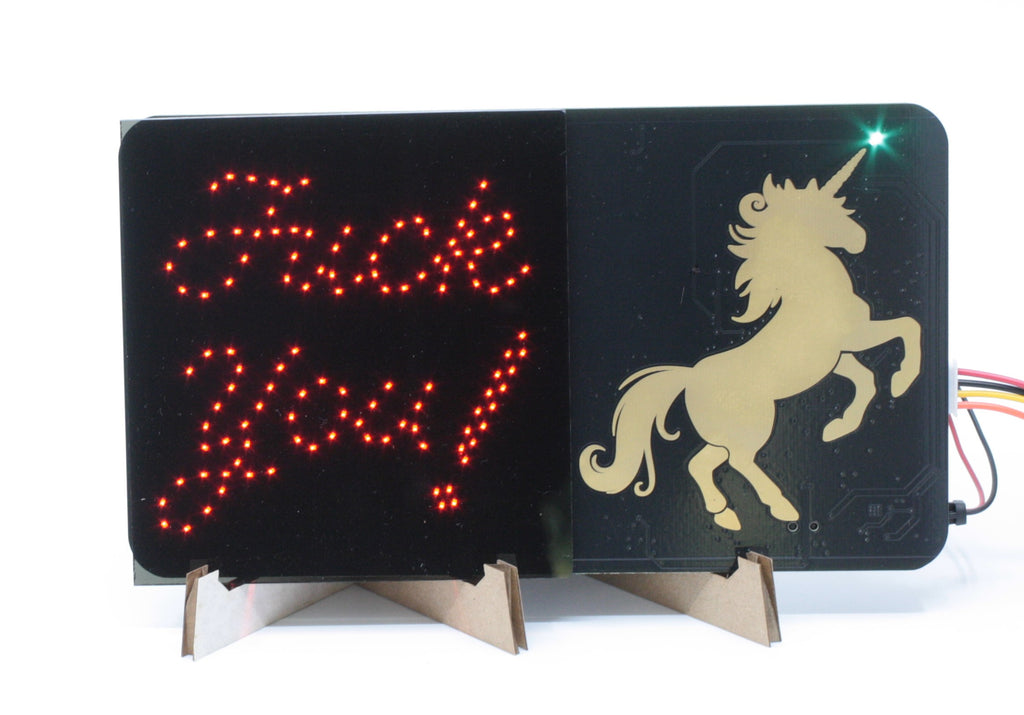
It's a unicorn with a special message.  The base kit activates the message by touching the unicorn, and needs to be plugged in to work (you'll need to provide your own USB power or 5-12V power supply).  

The base kit includes:
- The majestic FUnicorn circuit board
- A piece of dark smoked acrylic to obscure the LEDs when unlit
- A cardboard stand
- A beautiful rainbow USB cord
- Stickers

The full kit includes:
- Everything in the base kit
- A Big Red Button kit (everything you need to add a large arcade button)
- A battery cable, 9V battery not included
A Distance Sensor kit (distance sensor, cables, and stand)
- Headers for the arduino shield pattern
- An FUnicorn magnet and more stickers

The code that ships with the FUnicorn activates the message by either touching the unicorn or pressing a button (provide your own or get the full kit).  It can be put into a low power mode for operating off of battery power by pressing and holding the button for the duration of one of the message cycles.  The message cycles through 5 different fun blinking patterns.

I originally made it as a white elephant gift exchange gag, but thought that this really had to exist in the world as a thing people could buy.  So I made it arduino-compatible and developed libraries for it, and added a shield pattern to the back.  I don't know about you, but I'm much more interested in learning new skills when a project speaks to me, so I'm hoping this will inspire people to learn how to do basic embedded programming in the Arduino IDE.

It's a pretty big board at 4" x 7", a nice size to proudly display on your desk.  It has a majestic unicorn on it with **real gold** plating.  There's an unusual cyan-colored LED on the tip of its horn that adds to the magic.  There are 120 red LEDs that spell out...the thing that it says... in cursive.  So don't worry, your kids probably won't be able to read it anyway.  There's a custom-designed cardboard stand that also holds a piece of smoked acrylic in front of its special message, so it's hidden until activated.  And I found amazing rainbow USB cables, which really tie it all together.  It's also completely made in the USA.  This is also an explanation as to why it's not cheaper.  The size of the board, the number of LEDs, and the fact that it's US-made in a relatively small quantity make it cost more.  

There are 120 LEDs soldered in place to spell out its beautiful message in classy-ass cursive.  Although it's a one-trick pony and you can't change what it says, the possibilities of how to trigger the message are endless.  There's an arduino shield pattern on the back, so you can solder on the headers (or wires) and add practically any sensor to it.  Want to make a "6 feet, mofos" sign?  Add a distance sensor and/or a motion detector.  Want to tell someone they're being too loud?  Add a microphone.  Want to simply keep track of how many times you've told people off?  Add an LCD shield.


$
59.69
 
$

Set up & Assembly:

​In our other instructions, we Put the U in FUnicorn; this time, we’re all about the F! With our shield headers in place, and so many available Arduino shields, the world is our oyster, or whatever the unicorn equivalent is – probably some kind of fancy berry or something! In our previous blog post, we alluded to a Wi-FUnicorn, but that beast will have to remain mythical for now, since we ran into some pin conflicts and other issues that made its performance a little less stable than we’d have typically preferred. So, we headed back to the drawing board with a blank canvas – or more accurately, a blank proto shield – specifically, Arduino’s Proto Shield Rev3 for the Arduino Uno, which in addition to the typical prototyping area found on most boards of its ilk, has those really nice labeled pins like the newer Arduino boards, and also a great little SMD area where you can add a 24-pin (or fewer) SOIC.
The FUnicorn is literally one flashy pony out of the box, but we wanted to really make it shine. The protoboard made it easy to add more LEDs, but that wasn’t enough – we wanted to really put on a serious dog and pony show. So, we thought: what if we made our filly a bit more philharmonic? Browsing audio shields, we noticed a common theme: they typically used SPI, and since the FUnicorn LEDs already use those same pins for PWM pulsing, they were unavailable. However, I2C, UART, analog, and many digital I/O pins are free and clear! So we looked at other modules, eventually settling on the $15 “WayinTop Sound Module Button Control Music Voice Player Programmable Talk Chip” on Amazon, which rather than relying on a complicated SPI bus, would allow us to trigger a preloaded MP3 with high or low, similar to a button.
Due to the its capacitive touch interface, which works by using a pullup to stick a voltage on a pin and measure how fast it decays, the FUnicorn must constantly poll to see if its giant golden likeness is being interacted with. This presented a challenge for our additional functionality that we wanted to layer on top, since we wanted our LED and audio to have some specific timing characteristics in order to put on the show as we’d envisioned it. In the end, we solved this by playing a short LED animation as part of the capacitive touch loop, counting down the number of cycles we needed to approximately match the length of our audio, after the initial built-in animation (which is blocking) has completed. An extract of this code can be found below, and the full example can be found in our GitHub repo, or the Examples > Alpenglow FUnicorn menu if you already have the library installed, and have updated it.

Code:

With everything now working precisely how we envisioned it – or close enough – allow us to demonstrate to you the glorious result:

We couldn’t think of any lyrics that better represent our marvelous mare than Mermaid Sisters’ Galactic Mermaid from Shinichirō Watanabe's Carole & Tuesday (which is where the "B" in FBUnicorn comes from!), though of course you can load as filthy or clean of a song as you like onto the board’s microSD card. If you build this project, let us know what song you chose, or maybe in the next installment we’ll get that Wi-Fi working and turn the FUnicorn into a networked jukebox so that you can pick your favorite track remotely!

Have any questions?  Contact us!