Blinky LED Box Guide

Overview

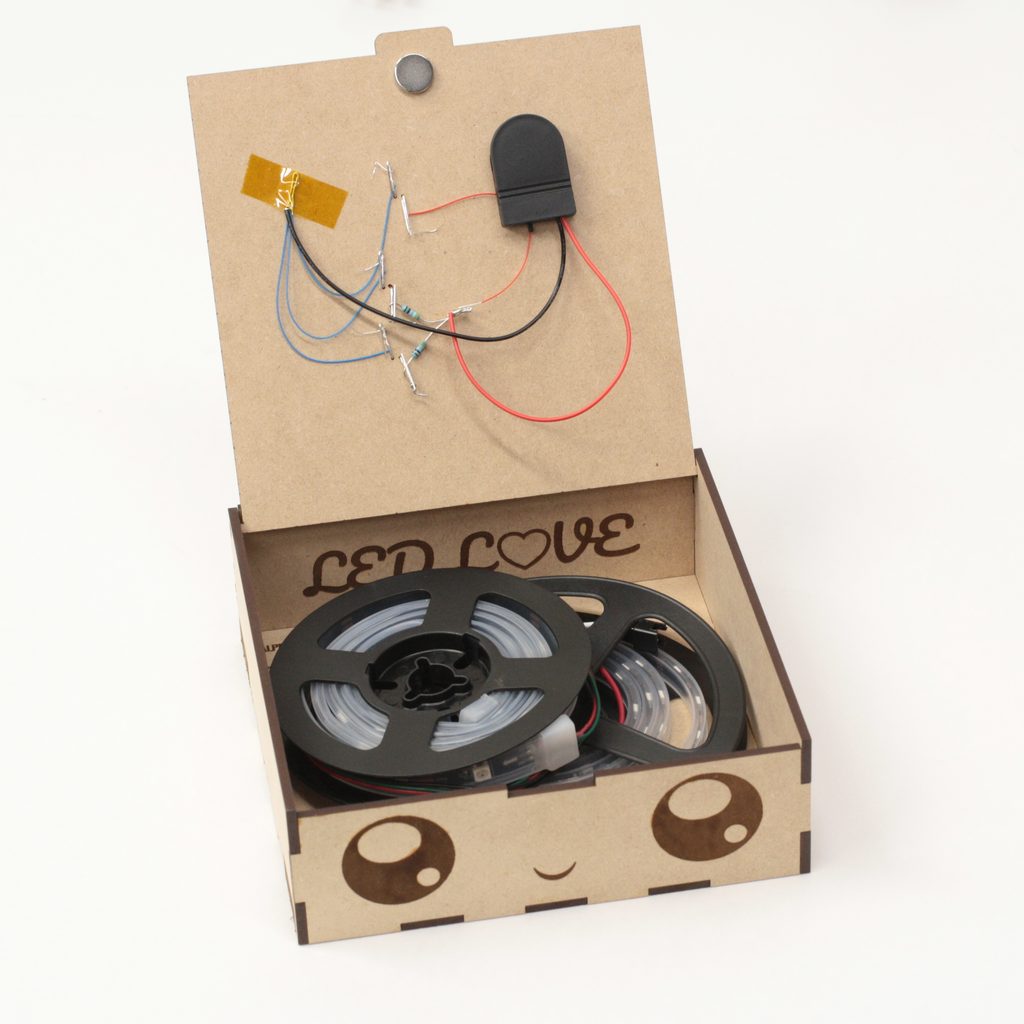
decoNot only is this a handy box for you to keep all your LEDs in, it's also a light up kit, and a super cute friend we call Blinky!

Box comes as a kit that will need to be assembled. Glue is not provided in this kit.

Box measurements: 6" x 6" x 2"

It's an LED that holds your LEDs! We wanted to spread the LED love with this cute WS2812 character we dubbed Blinky. We can't get enough LEDs and Blinky thinks you can't either.

This kit comes with pre-cut squares so you can assemble your own WS2812 LED box!
It also comes with:
1 - Red self-blinking 3mm LED
1 - Green self-blinking 3mm LED
1 - Blue self-blinking 3mm LED
3 - Pre-stripped blue wires
1 - Pre-stripped red wire
1 - Battery holder
1 - CR2032 battery
2 - Magnets with adhesive backs

The only thing you'll need to provide is wood glue but don't worry, it's easy and you don't need clamps!

$
19.95
 
$

Unpack your Kit

Each kit has the following items included:
1 - Unassembled box
1 - Pre-stripped red wire
3 - Pre-stripped blue wires
1 - Battery holder
1 - CR2032 battery
2 - 499 ohm resistors
2 - Self adhesive magnets
1 - Adhesive dot
1 - Red 3mm self blinking LED
1 - Green 3mm self blinking LED
1 - Blue 3mm self blinking LED

Glue left & back panels to base

Place your box base on a flat surface. The base can go in any orientation you prefer. Take the left panel making sure that the engraved side is facing out and the hole is towards the back. Place glue along the indented side of the base and the left panel. Line up and hold until secured. Place glue along the indented sides of the back panel. Place panel with engraving side facing inward.

Place lid in holes & glue right panel

Place the tab on the lid through the hole on the left panel. Apply glue to right panel and line up, making sure the engraving is facing outward and the hole is towards the back. Place the other tab on the lid through the right panel. Let the lid rest on the base while the right panel dries.

Glue front panel

Apply glue to the front panel. Lift up the lid and place front panel making sure that the engraving is facing outward. Once front panel is in place, let the lid rest in the notch on the top of the front panel.

Clean off excess glue

Wipe off excess glue and let dry.

Attach magnets

Remove the paper covering the adhesive on the magnets. Place one magnet centered below the notch on the front panel. Place the other magnet on the lid lining up with the magnet on the front.

Place LEDs

Place the red, green, and blue LEDs in the order shown. Make sure the long leg goes through the right hole and the short leg goes through the left hole for each LED. Bend the LED legs to secure.

Wrap red wire and resistors

The red wire goes around the long leg of the blue LED. Wrap around the leg 3-4 times, then bend the leg in half to secure. Next, wrap the resistors around the long legs of the red and green LEDs. Wrap 3-4 times then bend the leg in half to secure.

Wrap the blue wires

Wrap the blue wires around the short legs of the red, green, and blue LEDs. Wrap 3-4 times then bend the LED leg in half to secure.

Attach the positive side of the batter holder

Take the resistors and the red wire on the LEDs along with the red wire from the battery holder. Twist together then bend in half to secure.

Attach the negative side of the battery holder

Grab the 3 blue wires and the black battery holder wire and twist together. Bend in half to secure. Optional step is to take some tape to secure the wires to the lid of the box.

Place battery in battery holder


Attach adhesive dot to battery holder and attach to lid

Remove the paper from the dot and stick to the battery holder. Take off the paper on the other side and press firmly onto the lid of the box.

Turn on and light up LEDs!

Elsewhere on the Web

Have any questions?  Contact us!